Overview
KronoGraph lets you add annotations on events and entity ranges. This provides more context for presentations, investigative workflows or exported timelines. Annotations can also be used to create a collaborative tool between multiple people who share and analyze the same timeline.
Add annotations to your timeline using the annotationsannotations API or allow users to make them as they explore the timeline (see Creating annotations).
This example uses a NYC Pizza Slices dataset and shows two annotations loaded into the timeline with the default settings.

Default
Log in to view live examplesAnnotations refer to a subject, which can be events or entity ranges, and contain a text label. In the chart above the Great value at Luigi's annotation has an entity range as the subject and the Best tasting pepperoni annotation has two events as the subject. These are defined as follows:
timeline.annotations({
  note1: {
    subject: ['event36', 'event105'], // subjects are event IDs
    label: 'Best tasting pepperoni'
  },
  note2: {
    subject: [ // subjects are entity IDs and a time range
      {
        id: `Luigi's Pizza`,
        range: { start: Date.UTC(2016, 0, 5), end: Date.UTC(2017, 2, 22) },
      },
    ],
    label: `Great value at Luigi's`,
  },
});<Timeline
annotations={
note1: {
subject: ['event36', 'event105'], // subjects are event IDs
label: 'Best tasting pepperoni'
},
note2: {
subject: [ // subjects are entity IDs and a time range
{
id: `Luigi's Pizza`,
range: { start: Date.UTC(2016, 0, 5), end: Date.UTC(2017, 2, 22) },
},
],
label: `Great value at Luigi's`,
},
}
/>By default, the deleteAnnotation control is displayed. When clicked, it fires an annotations event.
By default, the deleteAnnotation control is displayed. When clicked, it fires an onTimelineChange event.
Annotations are located in their own layer on top of the timeline are only drawn when their subjects are visible. This means that they can optionally be included in an exported image to share offline with others.
Take a look at the Crime Investigation demo to see how annotations can be used.
Creating
Annotations can be created live in the timeline by selecting events, and then adding annotations to them:
// Turn on selection mode
timeline.eventSelectionMode(true);

timeline.on('drag-end', () => {
  const eventIds = timeline.eventSelection();

  if (eventIds.length > 0){
    // Make one annotation pointing at all the selected events
    timeline.annotations({
      myAnnotation: {
        label: 'These events are interesting',
        subject: eventIds
      }
    });
    // Clear the selection
    timeline.eventSelection([]);
    // Exit selection mode
    timeline.eventSelectionMode(false);
  }
});
export const myComponent = () => {
const [annotations, setAnnotations] = useState({});
const [eventSelection, setEventSelection] = useState([]);
// Turn on eventSelection mode
const [eventSelectionMode, setEventSelectionMode] = useState(true);
function makeAnnotation(){
// Make one annotation pointing at all the selected events
const eventIds = eventSelection;
if (eventIds.length > 0){
const myAnnotation = {
label: 'These events are interesting',
subject: eventIds
}
setAnnotations({myAnnotation});
}
// Clear the eventSelection
setEventSelection([]);
// Exit eventSelection mode
setEventSelectionMode(false);
}
return (
<Timeline
entities={entities}
events={events}
onTimelineChange={event => {
if (event.eventSelection !== undefined) {
setEventSelection(event.eventSelection);
}
}}
onTimelineDragEnd={makeAnnotation}
annotations={annotations}
eventSelection={eventSelection}
eventSelectionMode={eventSelectionMode}
/>
)
}Try it out with the Creating Annotations story.
Positioning
By default, annotations appear between the timeline data and the scale in a rail at the top of the timeline. However, annotations can also be in the 'bottom' rail or 'free' relative to their event or entity range subjects.
Annotations can be repositioned in the timeline by clicking and dragging, or can be dragged into or out of the rails.
Default
Log in to view live examplesHere, the Best tasting pepperoni annotation position is set to 'bottom', and the Great value at Luigi's annotation has an angle of 'sw' and a distance of '100px'.
timeline.annotations({
  note1: {
    subject: ['event36', 'event105'],
    label: 'Best tasting pepperoni',
    position: { angle: 'bottom' }, // the annotation is in the bottom rail
  },
  note2: {
    subject: [
      {
        id: `Luigi's Pizza`,
        range: { start: Date.UTC(2016, 0, 5), end: Date.UTC(2017, 2, 22) },
      },
    ],
    label: `Great value at Luigi's`,
    position: { angle: 'sw', distance: 100 }, // the annotation is set relative to the entity range
  },
});<Timeline
annotations={
note1: {
subject: ['event36', 'event105'],
label: 'Best tasting pepperoni',
position: { angle: 'bottom' }, // the annotation is in the bottom rail
},
note2: {
subject: [
{
id: `Luigi's Pizza`,
range: { start: Date.UTC(2016, 0, 5), end: Date.UTC(2017, 2, 22) },
},
],
label: `Great value at Luigi's`,
position: { angle: 'sw', distance: 100 }, // the annotation is set relative to the entity range
},
}
/>Settings that affect the size of the rails and annotations can be found in Timeline Options.
Styling
The annotation is comprised of two different sections, both of which can be styled:
- A body that shows the information about the subjects.
- A connector that relates the annotation to the subjects.
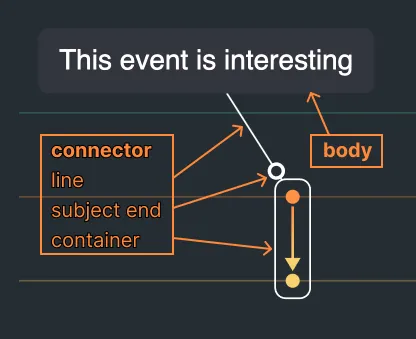
The connector is split into three parts which you can style using the connectorStyle property.
- A line pointing to the subject, or multiple lines for multiple subjects.
- An optional subject end set by the subjectEnd property.
- An optional container around event or entity range subjects set by the container property.
Default
Log in to view live examplestimeline.annotations({
note1: {
// annotation body style settings
subject: ['event36', 'event105'],
label: 'Best tasting pepperoni',
position: { angle: 'w', distance: 100 },
borderColor: 'orange',
borderWidth: 2,
connectorStyle: {
// annotation connector style settings
subjectEnd: 'dot',
container: 'rectangle',
color: 'orange',
width: 2,
lineStyle: 'dashed',
},
},
});<Timeline
annotations={
// annotation body style settings
subject: ['event36', 'event105'],
label: 'Best tasting pepperoni',
position: { angle: 'w', distance: 100 },
borderColor: 'orange',
borderWidth: 2,
connectorStyle: {
// annotation connector style settings
subjectEnd: 'dot',
container: 'rectangle',
color: 'orange',
width: 2,
lineStyle: 'dashed',
},
}
/>You can choose to show the delete or edit controls using the deleteAnnotation and editAnnotation control options.
Try out some of the options with the Styling Annotations story.
Editing
If you choose to enable the edit control for annotations, you will also need to write application code to edit the label text for the appropriate annotation in the annotations object.
You will need to capture the click event for the edit control. The targetType is 'annotationEditButton' and annotationId property contains the id of the annotation to be edited:
function clickHandler ({ targetType, annotationId }) {
  if (targetType === 'annotationEditButton') {
    console.log(`Annotation to edit: `, annotationId);
  }
}
timeline.on('click', clickHandler);
const handleClick = ({ targetType, annotationId }) => {
  if (targetType === 'annotationEditButton') {
    console.log(`Annotation to edit: `, annotationId);
  }
}
<Timeline
entities={entities}
events={events}
onTimelineClick={handleClick}
/>
Additionally, you will need to create an HTML element to handle the editing, show it when the edit button is clicked, and then save the edited text.
This can be seen in the Creating Annotations story.